JSON Web Token (JWT)
Example of a JWT Access Token
eyJ0eXAiOiJKV1QiLCJhbGciOiJIUzI1NiJ9.
eyJleHAiOjE2MDI0OTYwMjksInVzZXJfaWQiOjcsImlhdCI6MTYwMjQ5NDIyOX0.
v9H5nkbu_J0ysGqY2YUeufn1ypHmvvTc2k2WoDdztvw
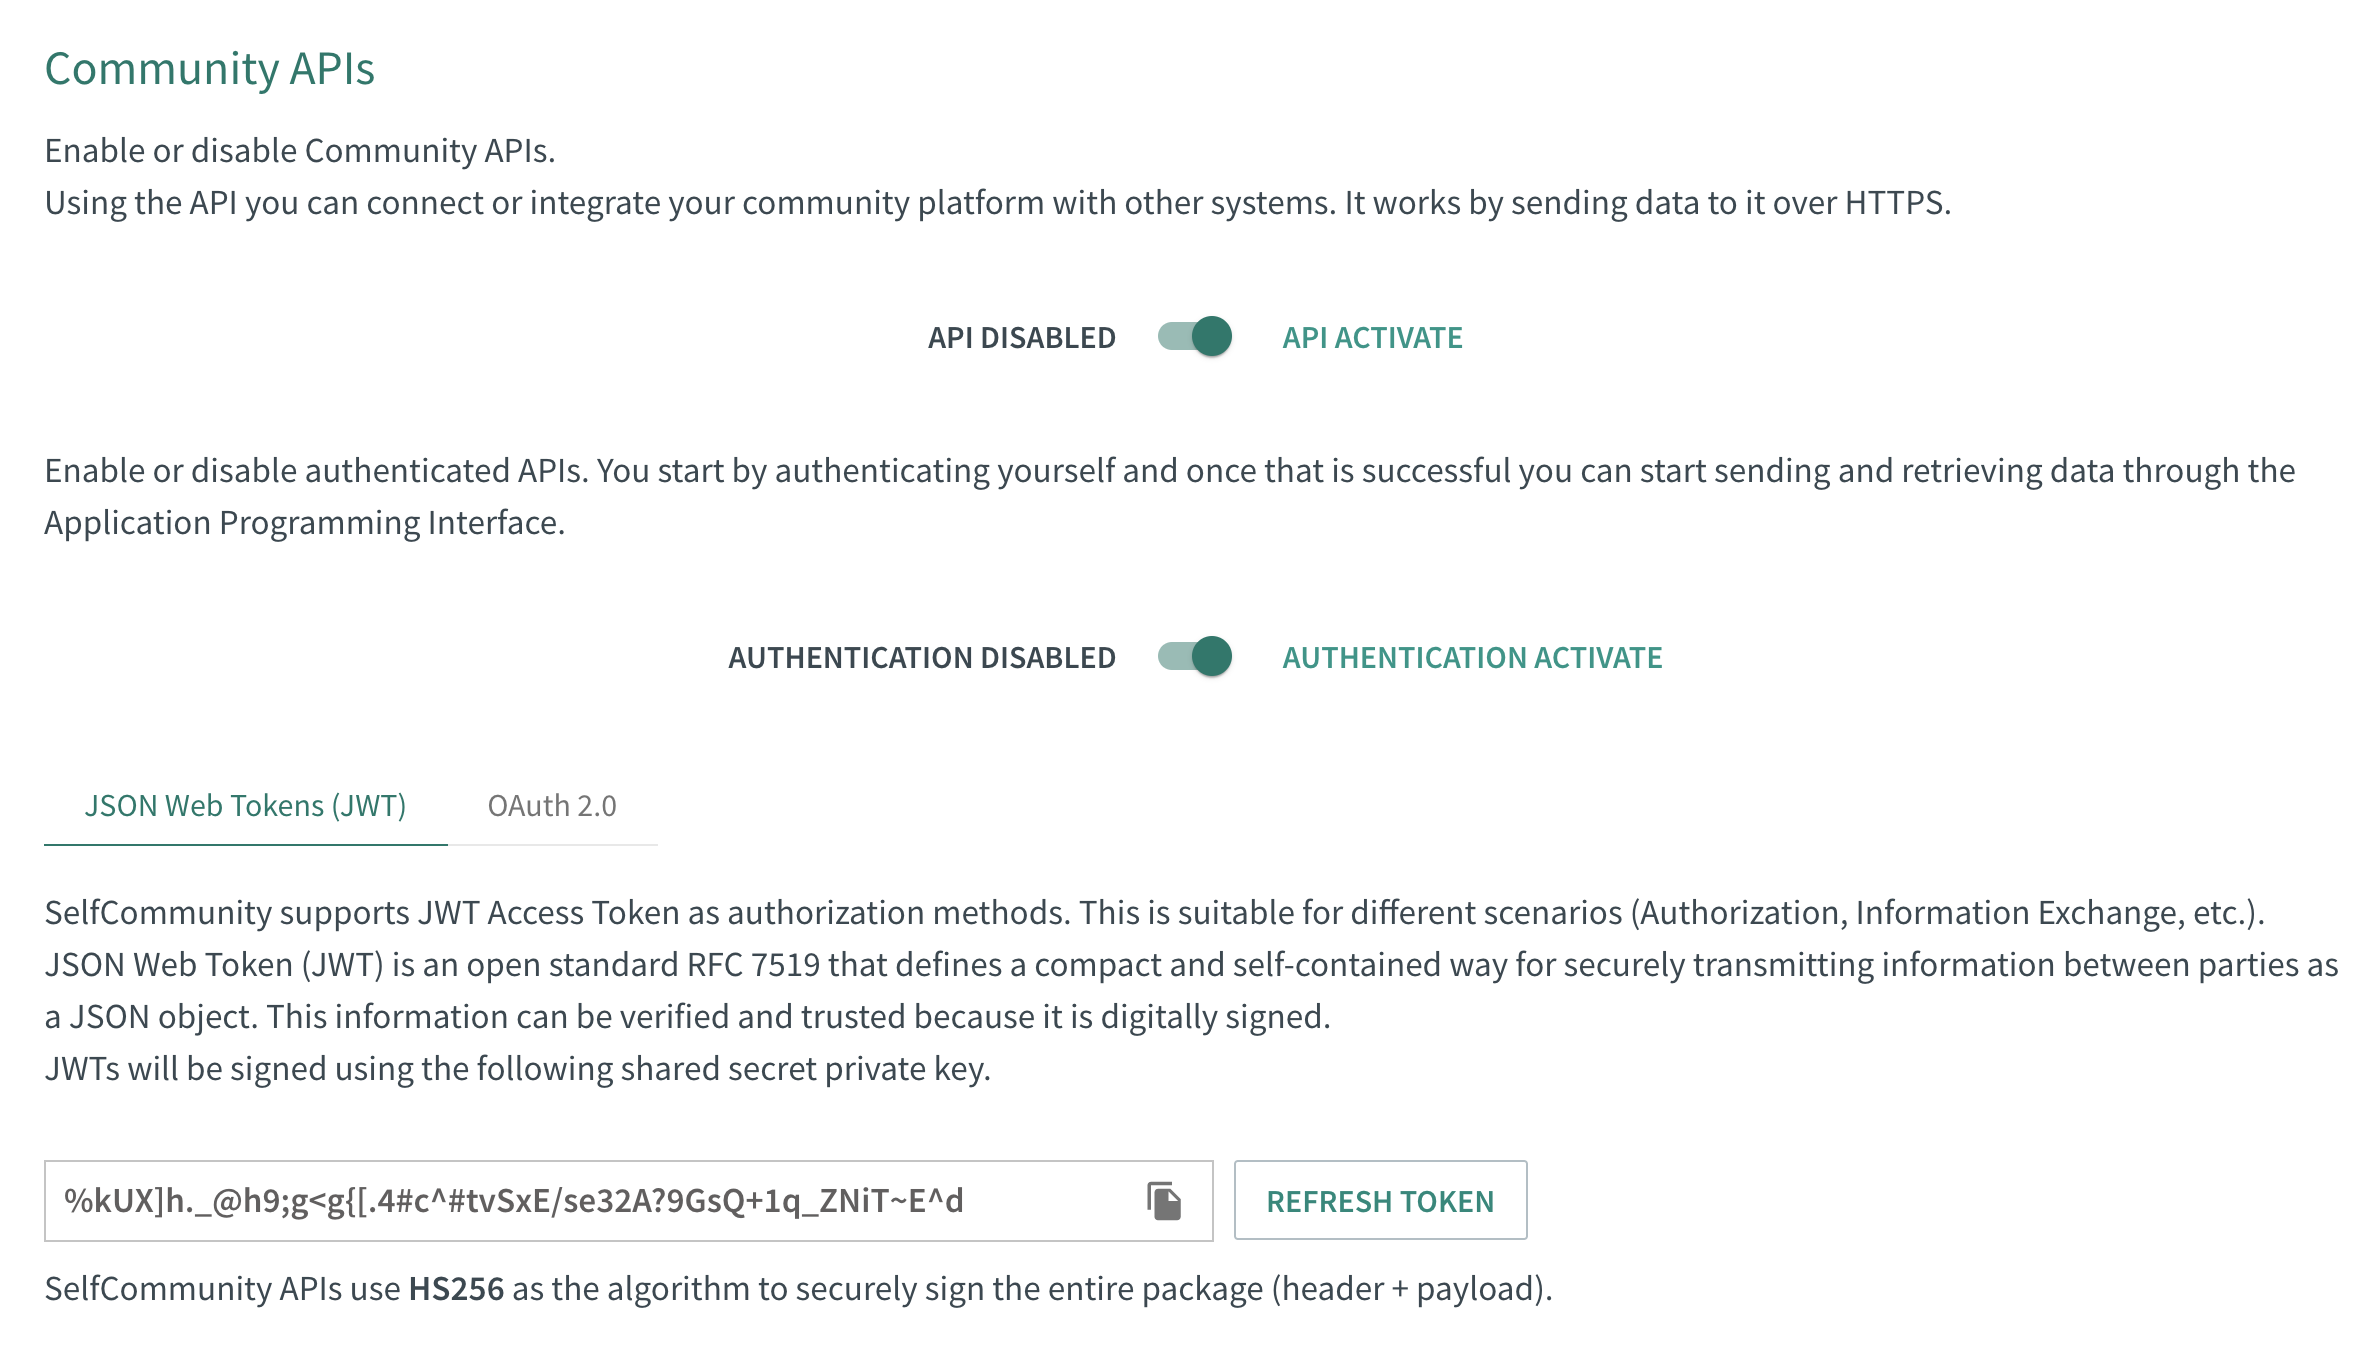
JSON Web Token (JWT) is an open standard RFC 7519 that defines a compact and self-contained way for securely transmitting information between parties as a JSON object. This information can be verified and trusted because it is digitally signed.
JWTs will be signed using a shared secret (with the HMAC algorithm). If your product support JWT access token, go to Community APIs panel under Integration menu on https://make.selfcommunity.io. You need to first check that you have enabled the Community APIs and Authentication APIs and retrieve the secret key in the JWT Authentication panel.
If you want to learn more about JWTs, we recommend the full documentation at jwt.io.
JSON Web Tokens are strings of text which are passed on every request (Header Authorization) to access protected resources of the server. They contain a combination of secrets from the API and payload data in the form of a JSON object.
Generating JWTs
A single JWT consists of three components: Header, Payload, and Signature with a . separating each.
For example, a JWT typically looks like the following:
aaaaa.bbbbb.ccccc
The SelfCommunity API recommends and supports libraries provided on jwt.io. While other libraries can create JWT, these recommended libraries are the most robust.
Below we see how to generate the three components of a jwt.
Header
Header of a JWT Token
{
  "alg": "HS256",
  "typ": "JWT"
}
The Header includes the specification of the signing algorithm and type of token.
- alg notes the algorithm being used. SelfCommunity APIs use HMAC SHA256 (HS256). Required.
- typ refers to the token type: JWT. Required.
Then, this JSON is Base64Url encoded to form the first part of the JWT.
Payload
The payload of a token contains the claims or the pieces of information being passed about the user and any metadata required. While there are three types of claims, registered, public, and private, we highly recommend using registered claims for interoperability.
Payload of a JWT Token
{
  "user_id": 1,
  "token_type": "access",
  "jti": "random unique identifier of the token",
  "iat": 1496091964000,
  "exp": 1496091964200
}
A payload require a user id (user_id), an expiration time (exp), an issued at a time (iat) and a JWT ID (jti). The ext_id is not necessary to authenticate the user. It is included if the token is generated by the community itself. It will not be verified in the authorization phase.
In particular:
- user_id notes the user unique id (in the community) identified by the token. Its value MUST be an integer number. Required.
- ext_id notes the user unique id (in the external service). Optional.
- token_type notes the type of the token. Its value MUST be "access". Required.
- exp (expiration time) notes the expiration time on or after which the JWT MUST NOT be accepted for processing. Its value MUST be a number containing a NumericDate value in seconds since Epoch (unix epoch time). The processing of the "exp" claim requires that the current date/time MUST be before the expiration date/time listed in the "exp" claim. Required.
- iat (issued at) notes the time at which the JWT was issued. This claim can be used to determine the age of the JWT. Its value MUST be a number containing a NumericDate value in seconds since Epoch (unix epoch time). Required.
- jti (JWT Id) notes a unique key identifier for the JWT. It is a (semi-)random string and the value MUST be assigned in a manner that ensures that there is a negligible probability that the same value will be accidentally assigned to a different data object. The "jti" claim can be used to prevent the JWT from being replayed (allows a token to be used only once). The "jti" value is a case-sensitive string. Required.
It is highly recommended to set the exp timestamp for a short period, i.e. a few minutes, a few hours. This way, if a token is intercepted or shared, the token will only be valid for a short period of time.
Signature
Signature of a JWT Token
HMACSHA256(
    base64UrlEncode(header) + "." +
    base64UrlEncode(payload),
    SECRET_KEY)
The Signature of the token base64 encodes the header and payload, then includes the API Secret within the HMACSHA256 algorithm to securely sign the entire package.
The signature is used to verify the message wasn't changed along the way and it can also verify that the sender of the JWT is who it says it is.
Putting all together
// Example of how to create a JWT token using jsonwebtoken library.
// If jsonwebtoken is not installed, instal with: npm install --save jsonwebtoken
// To generate the token, use this code:

var jwt = require("jsonwebtoken");
var SECRET_KEY = "f848a99779fe4b7bd2df67adcffde35ab6f4741eba8e3123"; // Your SECRET_KEY

function createToken(user) {
  var userData = {
    "user_id": 1, // or an other regisered user_id
    "token_type": "access",
    "jti": new Date().getTime() // or use another method
  };
  return jwt.sign(userData, SECRET_KEY, {
    algorithm: "HS256",
    expiresIn: "1h", // or choose another expiration time
    header: { typ: "JWT" }
  });
}
The output is three Base64-URL strings separated by dots that can be easily passed in the Authorization header.
<header>.<payload>.<signature>
Take a look at the example in the javascript code tab.
Code samples
To authorize, use this code:

# With shell, you can just pass the correct header with each request
curl "api_endpoint_here"
  -H "Authorization: Bearer <token>"

Make sure to replace <token> with your JWT access token.
// To authorize the request, use this code:

const headers = {
  'Accept':'application/json',
  'Authorization': 'Bearer '.concat(token)
};

fetch('<api_endpoint_here>',
{
  method: 'GET',
  headers: headers
})
.then(function(res) {
    return res.json();
}).then(function(body) {
    console.log(body);
});
Whenever the user wants to access a protected route or resource, the user agent should send the JWT, typically in the Authorization header using the Bearer schema.
The content of the header should look like the following:
Authorization: Bearer <token>
This can be, in certain cases, a stateless authorization mechanism. The server's protected routes will check for a valid JWT in the Authorization header, and if it's present, the user will be allowed to access protected resources. If the JWT contains the necessary data, the need to query the database for certain operations may be reduced, though this may not always be the case.
Verify JWTs
Code samples
# You can also use wget
curl -X POST /api/v2/jwt/verify_token/ \
  -H 'Accept: application/json'
  -H 'Content-Type: application/json; charset=utf-8'
  --DATA '{"token": "<token>"}'
const headers = {
  'Accept':'application/json'
};

const inputBody = {
    'token': '<token>'
};

fetch('/api/v2/jwt/verify_token/',
{
  method: 'POST',
  headers: headers,
  body: inputBody
})
.then(function(res) {
    return res.json();
}).then(function(body) {
    console.log(body);
});
This Endpoint test the validity of the token. It verifies the JWS (Signature) of the token.
Note: It does not verify the user_id, ext_id and the token_type of the payload.
HTTP Request
POST /api/v2/jwt/verify_token/
Responses
| Status | Meaning | Description | Schema |
|---|---|---|---|
| 200 | OK | Token is valid | none |
| 401 | Unauthorized | Token is not valid | none |
This operation does not require authentication